When the power goes out, the reassuring hum of a home standby generator isn't just a convenience—it's peace of mind, a safeguard against disruption and discomfort. But before you can enjoy that uninterrupted power, there's a crucial first step: the meticulous process of Installation & Safety: Setting Up Your Home Propane Generator System. This isn't a task to be rushed or taken lightly; it’s an investment in your home's resilience that demands expert planning, precise execution, and an unwavering commitment to safety.
From sizing your fuel tank to programming the transfer switch, every detail matters. This guide will walk you through the journey, transforming what might seem like a daunting project into a clear, manageable process, ensuring your propane generator system is installed correctly, safely, and ready to perform when you need it most.
At a Glance: Your Home Propane Generator Setup Checklist
- Professional Expertise is Non-Negotiable: Whole-house generators require certified electricians and gas plumbers.
- Size It Right: Accurately determine your power needs (whole home vs. essentials) to pick the correct generator and propane tank size.
- Location, Location, Location: Choose a safe, compliant spot away from windows and doors, on a level, solid foundation.
- Permits Are Essential: Secure all necessary electrical, plumbing, and zoning permits before installation begins.
- Minimum 250-Gallon Propane Tank: Grill tanks are insufficient. Your generator needs a dedicated, appropriately sized propane supply.
- Fuel Type Configuration: Ensure your generator is correctly set for liquid propane (LP) during setup.
- Electrical & Gas Connections: These are critical, precision tasks handled by licensed professionals.
- Test, Test, Test: Thorough system testing after installation confirms everything is operating safely and correctly.
- Understand Your System: Learn manual operation, maintenance alerts, and basic troubleshooting during the final walkthrough.
- Regular Maintenance: Adhere to a strict schedule for inspections and service to ensure long-term reliability.
Why Professional Expertise is Your Best Bet (and Often Required)
While some home projects might lend themselves to a DIY approach, installing a whole house propane generator is emphatically not one of them. This isn't just about connecting a few wires; it's about integrating a powerful electrical appliance with your home's main power supply and a highly flammable fuel source. The stakes are simply too high.
Licensed electricians and qualified gas plumbers bring indispensable expertise, ensuring every connection—electrical, fuel, and control wiring—meets stringent safety codes and manufacturer specifications. They navigate the complexities of local zoning laws, obtain the required permits, and understand the nuances of generator sizing and placement. Attempting this installation yourself not only jeopardizes your safety and the longevity of your equipment but can also void warranties and lead to significant legal and financial headaches. In short, leave this one to the pros.
Phase 1: Preparation – Laying the Groundwork for Reliable Power
Before a single wrench is turned or a wire is connected, careful preparation sets the stage for a successful and safe installation. Think of this as the blueprint phase, where all critical decisions are made.
Sizing Your Standby Power: Whole Home or Essentials?
The first decision involves evaluating your power needs. Do you want to power your entire home—lights, HVAC, major appliances, and electronics—without skipping a beat during an outage? Or are you primarily concerned with keeping essential systems running, like the refrigerator, a few lights, and perhaps your well pump or furnace?
- Whole-Home Power: This approach typically requires a larger generator and often an automatic transfer switch (ATS) that can handle your entire electrical panel. It offers maximum comfort and convenience.
- Essential Circuit Power: For this, specific critical circuits are isolated and connected to the generator via a smaller ATS. This is often a more budget-friendly option for the generator unit itself and consumes less fuel during operation.
A qualified installer will perform a load calculation, assessing your home's total electrical draw to recommend the precise generator size (measured in kilowatts, or kW) that matches your requirements. Don't guess here; oversizing wastes fuel and money, while undersizing leaves you in the dark when you need power most. To truly understand the options and considerations, you might want to learn about home propane generators in more detail.
Choosing Your Fuel Type: Why Propane Shines for Standby Power
When it comes to home standby generators, the two primary fuel sources are natural gas (NG) and liquid propane (LP). While natural gas offers continuous fuel supply from a utility line, propane presents several compelling advantages, especially for backup power:
- Availability: Propane is stored on-site in tanks, making it ideal for rural areas where natural gas lines may not exist.
- Portability (of the fuel): Propane can be delivered directly to your property, making it accessible regardless of your home's location relative to utility lines.
- Clean-Burning: LP is a clean-burning fuel, contributing to longer engine life and reduced emissions.
- Reliability: Unlike natural gas, which can be interrupted during a major disaster or pipeline damage, your on-site propane supply remains accessible.
For many homeowners, especially those prioritizing self-sufficiency during outages, propane is the clear winner. This guide focuses specifically on setting up systems that rely on this versatile fuel.
Selecting the Optimal Installation Location: Safety First
The generator's location isn't arbitrary; it's dictated by a host of safety regulations, local codes, and practical considerations. Your installer will meticulously evaluate your property, but here are the key factors:
- Level Surface: Generators must sit on a stable, level foundation, typically a concrete pad, to prevent vibration issues and ensure proper operation.
- Distance from Openings: Strict codes mandate minimum distances from windows, doors, vents, and other building openings to prevent exhaust fumes from entering your home. This is crucial for carbon monoxide safety.
- Proximity to Fuel Source: The generator needs to be reasonably close to the propane tank to minimize gas line length and cost.
- Proximity to Electrical Panel: A shorter run to your home's main electrical panel (where the ATS connects) reduces electrical installation costs and voltage drop.
- Airflow: The unit requires ample clearance around it for proper ventilation and cooling.
- Noise Considerations: While modern generators are quieter, placement can impact noise levels heard from inside your home or by neighbors.
- Accessibility: Ensure technicians can easily access the generator for maintenance and service.
Navigating the Permit Maze: Don't Skip This Step
Installing a whole house generator involves significant modifications to your home's electrical and gas systems, triggering the need for permits. These typically include:
- Electrical Permits: For connecting the generator to your home's electrical system via the automatic transfer switch.
- Plumbing/Gas Permits: For installing and connecting the propane tank and gas line.
- Zoning/Building Permits: To ensure the generator's placement complies with local setback requirements and property lines.
Your professional installer will typically handle the permit application process, ensuring all documentation is submitted correctly and inspections are scheduled. This step validates that your installation adheres to all safety and building codes, protecting your family and your investment.
Phase 2: The Installation Process – From Pad to Power
Once the groundwork is laid and permits are secured, the physical installation begins. This phase is a symphony of specialized trades working in concert.
Expert Site Assessment: Confirming the Master Plan
Before any heavy lifting, the installation professional conducts a final, thorough site assessment. This isn't just a re-check; it's a deep dive to confirm the optimal location, identify any unforeseen challenges, verify existing connections (electrical, gas), and ensure full compliance with all local codes. This assessment prevents costly surprises down the line.
Building a Solid Foundation: Stability You Can Trust
The generator needs a firm, unyielding base. This typically involves pouring a concrete pad specifically sized for the generator unit. In some cases, a pre-fabricated composite pad might be used, but the principle remains: the foundation must be level, stable, and capable of supporting the generator's weight without settling or shifting over time. Proper drainage around the pad is also essential to prevent water accumulation.
Setting the Generator: A Precision Placement
With the foundation ready, the generator unit itself is carefully moved into place. Given the significant weight of these machines, specialized equipment (like cranes or forklifts) may be required. Once on the pad, the generator is secured, ensuring it is perfectly level and aligned for subsequent electrical and gas connections.
Crucial Connections: Electrical & Propane – The Heart of the System
This is arguably the most critical stage, demanding the highest level of professional expertise.
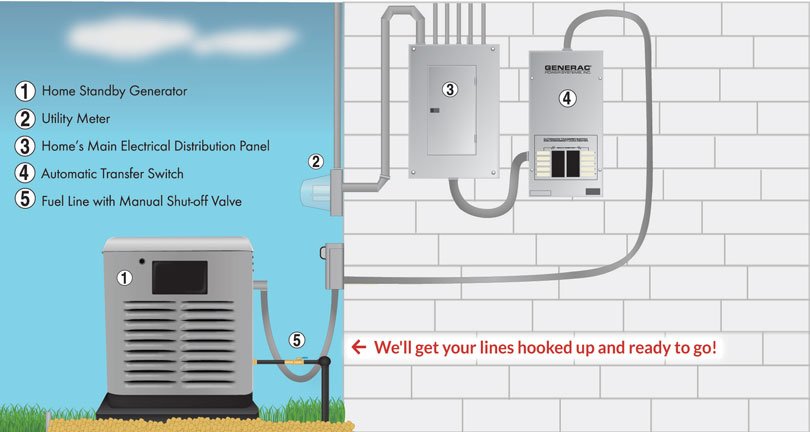
- Electrical Connections: The generator is wired to your home's main electrical panel through an automatic transfer switch (ATS). The ATS is the "brain" of your system, constantly monitoring utility power. When an outage occurs, it automatically disconnects your home from the utility grid and transfers the load to the generator, then reverses the process when utility power is restored. Precise wiring ensures seamless power transfer and protects your home from dangerous backfeeding into the grid. If you encounter errors related to
194and23transfer circuit wires, it's a clear sign to contact a certified service dealer, as these are critical safety circuits. - Gas Connections: A dedicated propane gas line is run from your outdoor propane tank to the generator. This connection involves meticulous piping, pressure testing, and leak detection to ensure absolute safety. The size of the gas line and the regulator must match the generator's fuel demand to guarantee a consistent and adequate supply.
Fuel System Deep Dive: Propane Tanks & Supply
Your generator is only as good as its fuel supply. For home standby generators, specific requirements ensure reliable operation.
- Sizing Your Propane Tank: This is where the ground truth is critical: Generac home standby generators require a minimum 250-gallon propane tank. You absolutely cannot use standard LP grill tanks; they lack the vaporization capacity needed for continuous, high-volume fuel delivery to a home generator. Larger capacities may be needed based on several factors:
- Generator Size: Bigger generators burn more fuel.
- Climate: Colder temperatures reduce the rate at which liquid propane vaporizes into a gas, so a larger tank provides more surface area for vaporization.
- Anticipated Run Time: How long do you expect to power your home during an outage? A 250-gallon tank might offer 2-3 days of power for an average 16 kW generator under moderate load, but this can vary wildly. Your installer will help you determine the optimal tank size to meet your specific needs.
- Beyond the Tank: Monitoring Your Fuel: Many modern systems integrate with fuel monitoring technology. For instance, the Mobile Link app offers a setup menu to add Tank Utility monitors to an existing account. This allows you to remotely check your propane levels, giving you advanced warning when it’s time for a refill and eliminating the guesswork.
Generator Configuration: Setting Up for LP
Many Generac air-cooled home standby generators are factory-set for natural gas (NG). A critical step in the installation process is configuring the generator to run on liquid propane (LP). The method depends on your generator model:
- Next Generation Series (10–28 kW): Fuel type is typically set in the Field Pro app during the guided setup process by the installer. This digital configuration ensures precise calibration.
- Guardian Series (10–26 kW, 2017 to present): These units often feature a physical fuel selector knob. The installer will adjust this knob to the "LP" setting. It's also vital to verify the mechanical fuel valve position and check the fuel selection setting in the Evolution control panel to confirm correct configuration.
- 7.5 kW PowerPact Model: This specific model has its own configuration requirements, which your certified technician will be familiar with.
Ensuring your generator is correctly configured for LP is paramount. An incorrect setting can lead to poor performance, engine damage, or failure to start when needed.
First Ignition: System Testing – The Moment of Truth
Once all connections are made and the generator is configured, the technician performs a comprehensive system test. This includes:
- Leak Detection: All gas connections are meticulously checked for leaks using specialized equipment.
- Transfer Switch Operation: The ATS is tested to ensure it correctly detects power outages, transfers load to the generator, and safely switches back to utility power.
- Generator Start-Up & Performance: The generator is started, and its performance under load is monitored. This often involves temporarily simulating an outage to confirm seamless power flow to your home.
- Safety Features: All safety shutdowns and alarms are verified to be functioning correctly.
Your Personal Walkthrough: Understanding Your New System
The installation isn't complete until you, the homeowner, understand how to operate and maintain your new system. The installer will provide a thorough walkthrough, explaining:
- Basic Operation: How the generator starts, stops, and transfers power automatically.
- Control Panel Features: Understanding indicators, error codes, and settings.
- Emergency Shut-Off Procedures: Where and how to safely shut down the unit if necessary.
- Maintenance Requirements: What you can do, and what needs professional attention.
- Propane Tank Monitoring: How to use the Mobile Link app or other methods to check fuel levels.
This is your opportunity to ask any questions and gain confidence in managing your backup power system. Remember, always read the generator's manual thoroughly. If any instructions are unclear, don't hesitate to contact Generac Customer Service or your authorized dealer.
Beyond the Basics: Enhancing Your Generator System
Modern home standby generators offer features and accessories that can further enhance their utility and your peace of mind.
- Two-Wire Start Feature: For specific applications, you might want to start your generator with a non-Generac switch (e.g., from an off-grid solar system or a custom automation setup). This feature requires purchasing and installing a specialized kit and programming the generator controller accordingly.
- Remote Connectivity: Mobile Link: Staying connected to your generator is easier than ever. Generac offers the Connectivity Cellular Accessory, with installation instructions available for compatible air-cooled and liquid-cooled models. Home Standby owners can install the Mobile Link 4G LTE Device or swap it with an existing pre-installed Mobile Link Wi-Fi device, enabling remote monitoring, status updates, and maintenance alerts directly to your smartphone or computer. This is invaluable for peace of mind, especially when you're away from home.
Phase 3: Post-Installation – Confirming Readiness & Understanding Your System
After the installation crew packs up, your responsibility shifts to understanding and verifying your new system's readiness.
Initial System Test: Proving the Concept
Even after the installer's tests, it's wise to request or perform an initial system test together. Confirm:
- Generator Function: Does it start reliably?
- Automatic Transfer Switch Operation: Does it smoothly switch your home's power source?
- Seamless Power Flow: Are all connected appliances receiving power without interruption?
- Load Capacity: Does the generator handle your typical home load without strain?
This test provides real-world assurance that your system is indeed "set up."
Critical Safety Inspections: Your Ongoing Vigilance
While professionals handle the initial installation, regular visual safety checks are crucial:
- Gas Connections: Periodically inspect visible gas lines and connections for any signs of leaks or damage. Any suspicion of a leak (smell of rotten eggs) warrants immediate professional attention.
- Electrical Connections: Ensure all electrical conduits and connections appear secure and undamaged.
- Airflow: Verify that nothing is obstructing the generator's vents or clearances. Keep the area around the unit clear of debris, vegetation, or stored items.
Fine-Tuning: Programming & Alerts
Most modern generators offer programmable features through their control panels or remote apps like Mobile Link. Take time to:
- Set Self-Test Schedules: Generators typically perform weekly or bi-weekly self-tests. Confirm the schedule is convenient and appropriate.
- Configure Maintenance Alerts: Set up notifications for oil changes, filter replacements, and other essential service reminders.
- Review Settings: Familiarize yourself with all settings, including language preferences, date/time, and exercise schedules.
Mastering Your System: The Final Walkthrough (Your Role)
Beyond the installer's initial explanation, spend time with your manual. Understand:
- Manual Operation: While automatic, know how to manually start or stop your generator if needed.
- Issue Monitoring: Learn to interpret common error codes or warning lights.
- Essential Maintenance: Know when to check oil levels, change air filters, or inspect spark plugs. While annual professional service is critical, knowing the basics empowers you.
Your Essential Paperwork: Keep It Safe
Upon completion, you should receive a packet of vital documents:
- Warranty Information: Understand your generator's warranty coverage and registration process.
- Owner's Manual/Maintenance Guide: Your go-to resource for operation and troubleshooting.
- Installation Diagrams: Electrical and gas line schematics can be invaluable for future service.
- Permits and Inspection Certificates: Proof that your installation meets all local codes.
- Service Contact Information: Keep your authorized dealer's number handy for maintenance or emergencies.
Long-Term Care: Sustaining Your Generator's Lifespan
Installation is a one-time event, but maintenance is an ongoing commitment. Proper care ensures your propane generator remains a reliable guardian for years to come.
Sticking to the Schedule: Your Generator's Lifeline
Just like your car, your generator needs regular attention. Adhere strictly to the manufacturer's recommended maintenance schedule for:
- Oil and Filter Changes: Fresh oil is vital for engine longevity.
- Spark Plug Inspection/Replacement: Ensures efficient combustion.
- Air Filter Replacement: Clean air intake is crucial for performance.
- General Wear and Tear Checks: Look for frayed belts, loose connections, or unusual noises.
The Power of Regular Runs: Keeping the Engine Healthy
A generator that sits dormant for too long can develop problems. Most units feature a weekly self-test function, where they run for a short period (e.g., 10-20 minutes) to circulate fluids, lubricate parts, and ensure readiness.
- Utilize the Self-Test: Ensure this feature is enabled and running as scheduled.
- Manual Monthly Run: If your unit doesn't have an automatic self-test or for extra assurance, manually run the generator for 15-30 minutes once a month. This keeps the battery charged and components in working order.
Inspect After Major Use: Post-Outage Due Diligence
After your generator has been put to the test during a prolonged power outage, perform a quick inspection:
- Check Oil Levels: Extended run times can consume some oil.
- Inspect for Leaks: Look for any oil, fuel, or coolant leaks.
- Air Filter Check: Ensure the air filter is still clean and free of debris, especially if the generator ran in dusty or windy conditions.
- Fuel Levels: Schedule a propane refill if your tank is low.
Annual Professional Maintenance: The Comprehensive Checkup
While you can handle basic checks, an annual professional service is indispensable. A certified technician will perform a comprehensive inspection, covering everything from valve clearances to electrical connections, ensuring:
- Optimal Efficiency: Fine-tuning the unit for peak performance.
- Early Problem Detection: Identifying potential issues before they become costly repairs.
- Warranty Compliance: Many warranties require documented professional service.
Prepare for Winter or Storm Season: Proactive Readiness
Before challenging weather hits, take proactive steps:
- Full Checkup: Ensure your generator is in top condition.
- Stock Supplies: Have essential supplies like fresh oil and filters on hand.
- Sufficient Fuel: Crucially, ensure your propane tank is full or near full. You don't want to run out of fuel mid-storm.
Your Path to Uninterrupted Power
Setting up your home propane generator system is a significant undertaking, but by understanding each phase—from meticulous preparation and professional installation to thorough post-setup checks and diligent long-term maintenance—you're empowering yourself with reliable, safe backup power. Invest in the expertise, follow the guidelines, and you'll transform uncertainty into peace of mind, knowing your home is ready for whatever comes next.